-
How to Remove FreeOffice from Windows Thoroughly?
- Mar 11,2021
- Uninstall Office Suite Software
-
Pick up the basics of how to remove FreeOffice from Windows operating system. How to uninstall with Windows built-in uninstaller, clean out leftover files and folders manually, along with professional troubleshooting uninstaller to remove all your unwanted programs in no time.
FreeOffice Overview
Office programs have become a vital part of work, home and educational uses. Choosing a good-to-use office software will give you a lot of convenience in the workplace and improve your productivity, especially when you are engaged in writing. The Microsoft Office suites is used by millions across the world. If you are considering choose a free program as an alternative to Microsoft Office, then this FreeOffice will be a choice. FreeOffice is permanently free for use, a complete office suite developed by SoftMaker. It comes designed with rich functions and features similar to the Microsoft office like word processor, spreadsheet, presentation, and you can directly open those files formatted in Microsoft Office without any compromises.
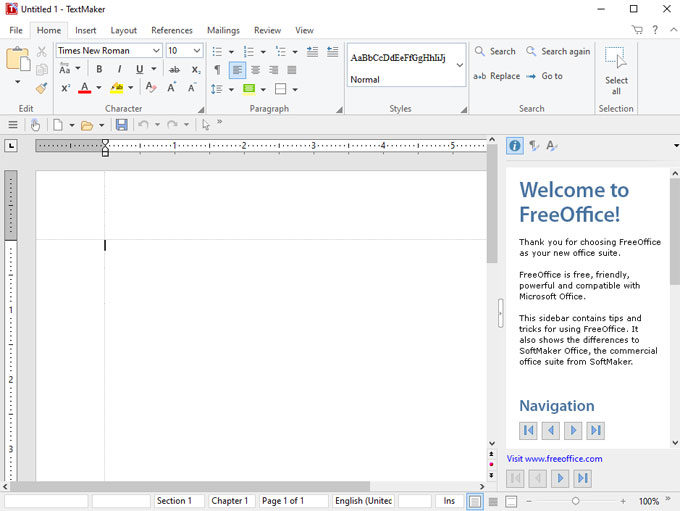
FreeOffice comes provided with user-friendly interfaces. Whether you like modern ribbons interface or classic menu and toolbars, the easy-to-use design allows you access the most essential functions quickly. If your computer comes with a touchscreen, FreeOffice allows switching to touch mode if you want. So, if you don’t want to pay Microsoft Office suite, the free version of FreeOffice is an alternative.
How to Remove FreeOffice from Windows-Based PC?
You will discover manual uninstall method, professional uninstaller, and tips that will allow you to uninstall FreeOffice more efficiently, save time, and begin your journey into the removal of unwanted programs for your Windows PC. The aim is not to teach you a class about uninstall a program, but to share knowledge and tools that will help you for years to come. Now, it is the time get how to remove FreeOffice completely.
Method 1: Uninstall FreeOffice Through Windows Built-in Uninstaller
We’ll get how to uninstall FreeOffice through Windows Control Panel in manual way here, no matter which version it is, Windows 7, Windows 8, or Windows 10.
1. Uninstall FreeOffice Through Control Panel (Windows 7, 8)
Step 1: Before removing the FreeOffice program, you should stop all related process running in the background. To quit FreeOffice from Task Manager: Right click the Start menu > select Task Manager > Task manager will open, select FreeOffice > click End process.
No matter which version of Windows you work on, quit the program’s process/tasks from Task Manager.
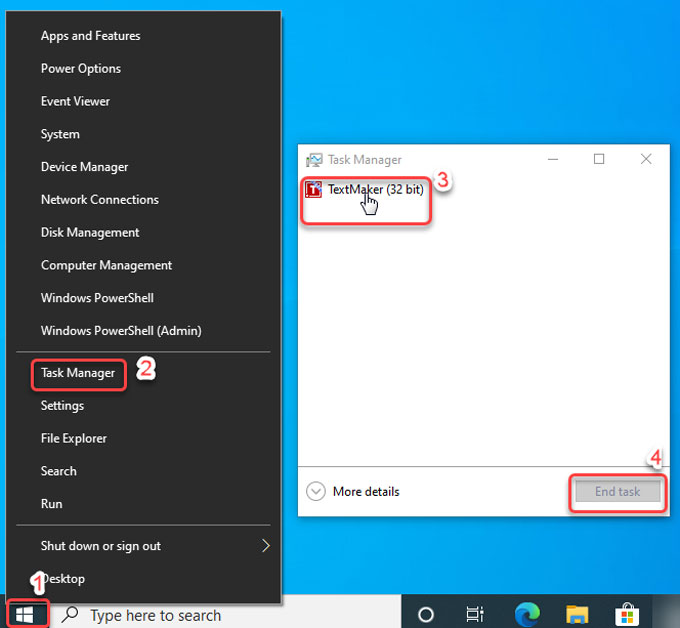
Please Note: FreeOffice suite includes TextMate, PlanMaker,and Presentations. If the three programs are running in the background, you need to quit all of them before starting an uninstall.
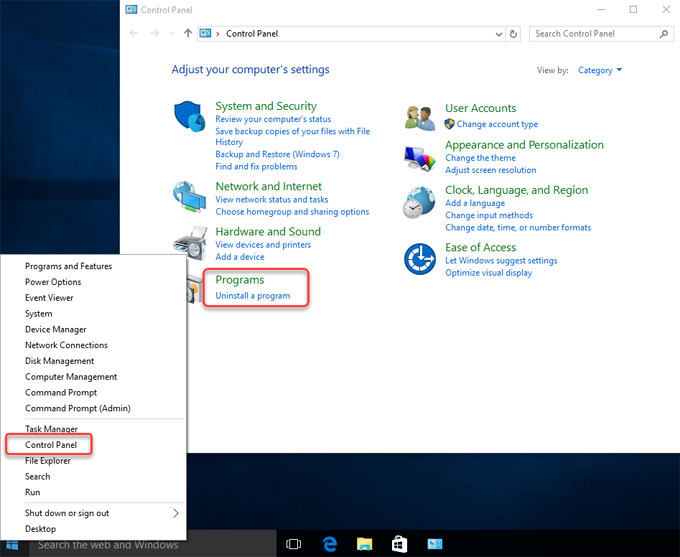
Step 2: Right-click the Start menu > select Control Panel > select Uninstall a program. You can use this function “Control Panel” if you are on Windows 7 or 8.
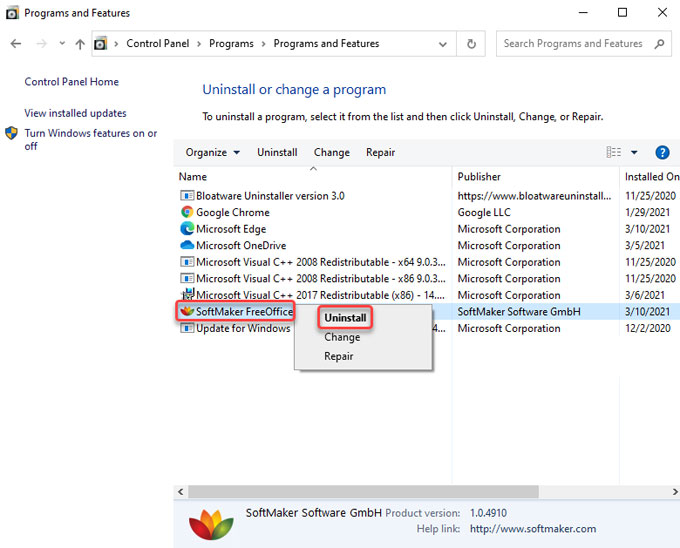
Step 3: In the Programs and Features window, select the FreeOffice program and click Uninstall.
Step 4: Click Next > click Remove option if you want to remove FreeOffice program right now. Follow the pop-up prompts to get the FreeOffice program removed from your computer.

Step 5: Right-click Start menu > Click Run option > Enter ‘regedit‘ in the Open box > Press Enter key or click OK.
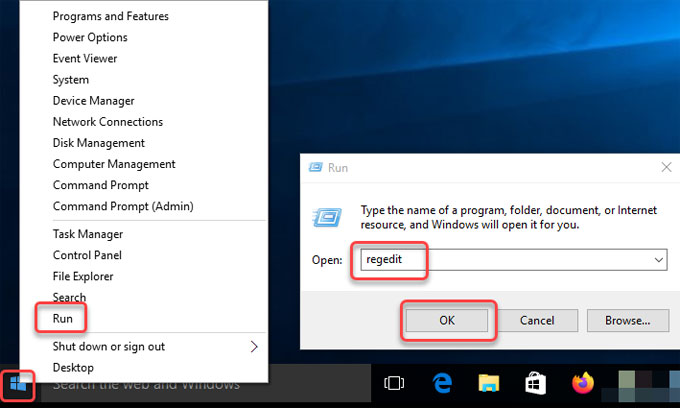
Step 6: Click Edit > Click Find > Enter FreeOffice pathname in Find what field > Click Find. You need to delete the left files related with FreeOffice manually, any wrong system file deletion may cause some problems.

HKEY_LOCAL_MACHINE\SOFTWARE
HKEY_CURRENT_USER\Software
HKEY_USERS\.DEFAULT\SoftwareStep 7: Restart your computer.
2. Uninstall FreeOffice Through Windows 10 Control Panel
Step 1: Right click the Start menu > select Task Manager > Task manager will open, select FreeOffice > click End task.
Step 2: If you are on Windows 10, you can use the “Type here to search” function beside the Start menu to locate at Control Panel. Click the Search box > enter “control panel” > open Control Panel.


Step 3: From Control Panel window, locate at Programs and click Uninstall a Program.
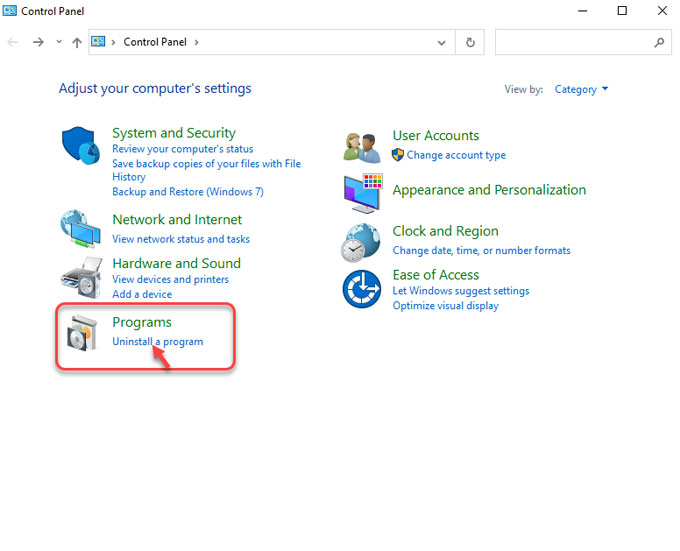
Step 4: Next, in the “Uninstall or change a program” Window, highlight and left click the FreeOffice program > select Uninstall. Follow the pop-up uninstall wizard to remove FreeOffice from your Windows 10. To clean out the leftover files, refer to the steps mentioned above.
Method 2: Remove FreeOffice Through Provided Bloatware Uninstaller
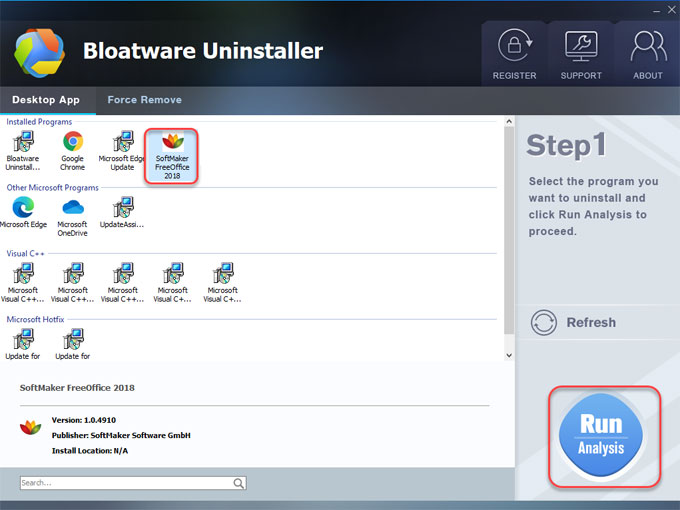
Step 1: Run Bloatware Uninstaller > Select FreeOffice > Click Run Analysis.
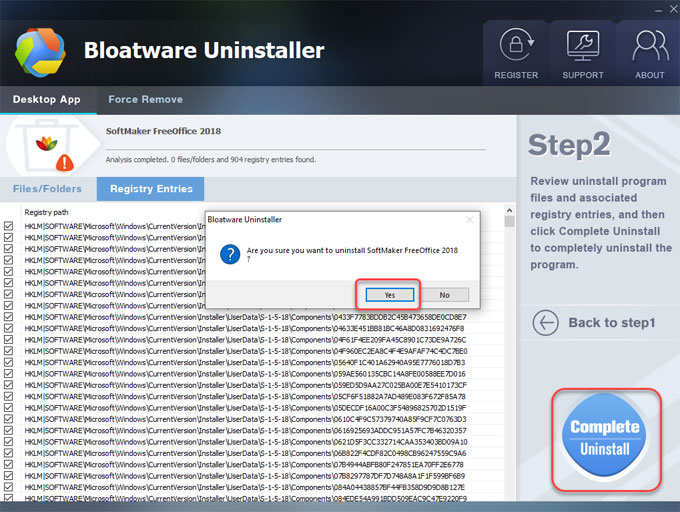
Step 2: Click Complete Uninstall > click Yes to make sure you want to remove FreeOffice.
Step 3: You will get the installation of SoftMaker FreeOffice. Click Next to continue.
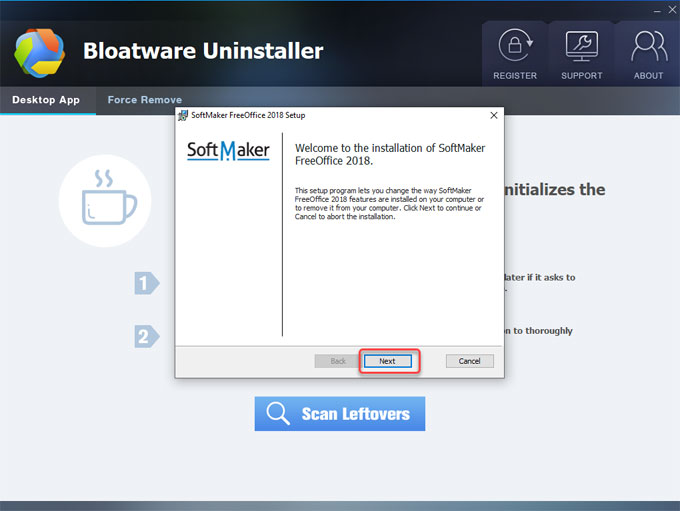
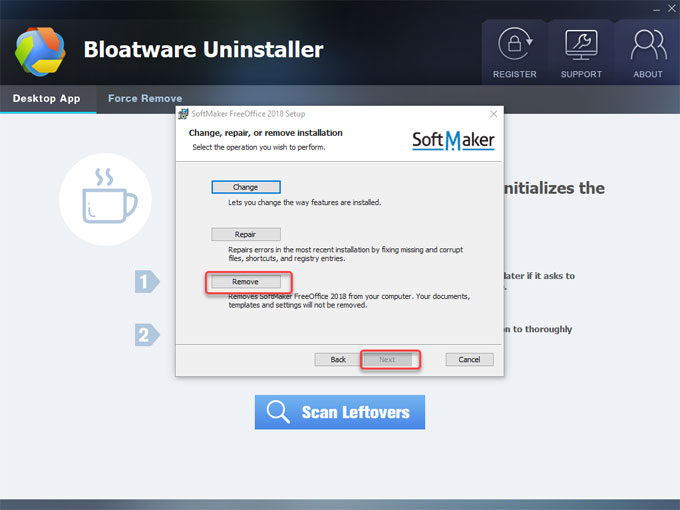
Step 4: There options of Change, Repair and Remove shows up, select Remove > click Next to continue.
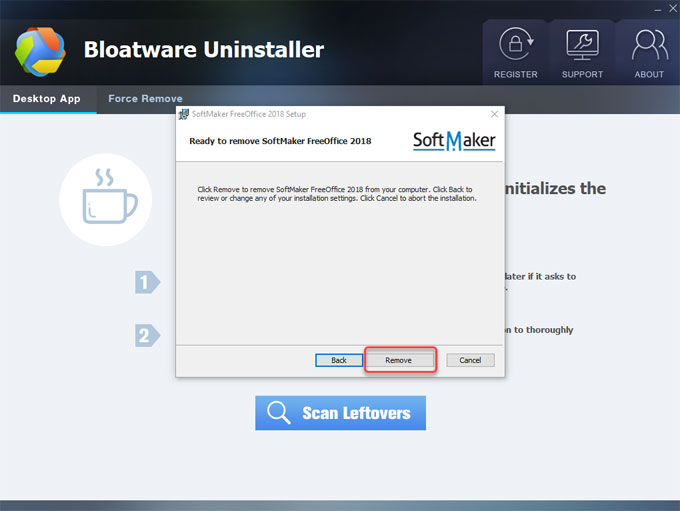
Step 5: Click Remove again to remove FreeOffice from your computer.
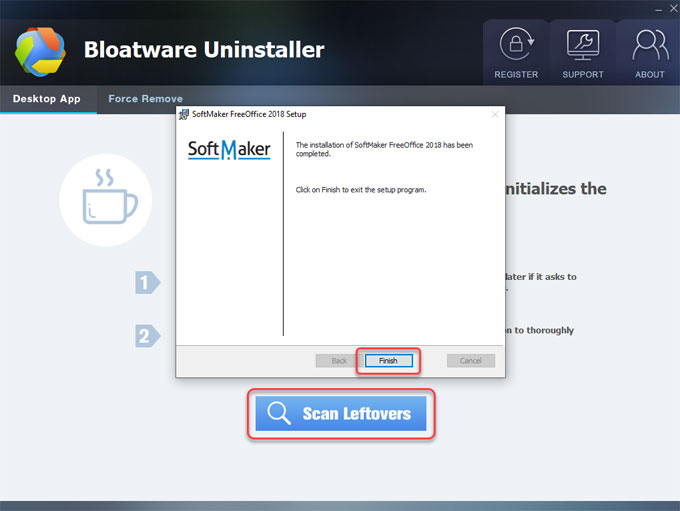
Step 6: The uninstall of FreeOffice has been completed. Click Finish > click Scan Leftovers to continue cleaning out remnants.
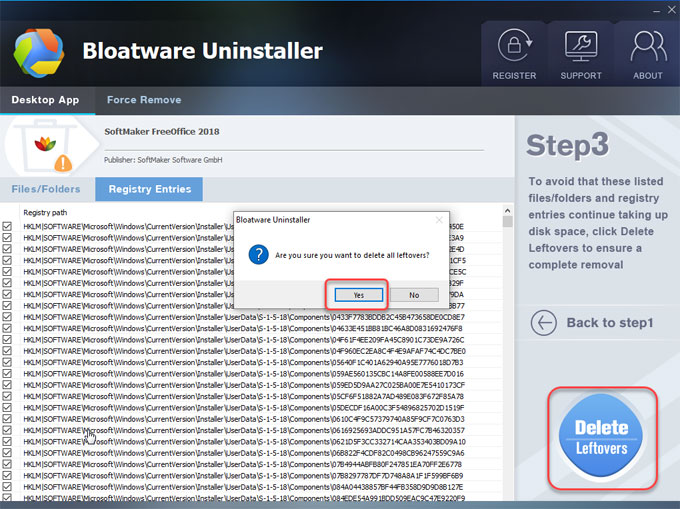
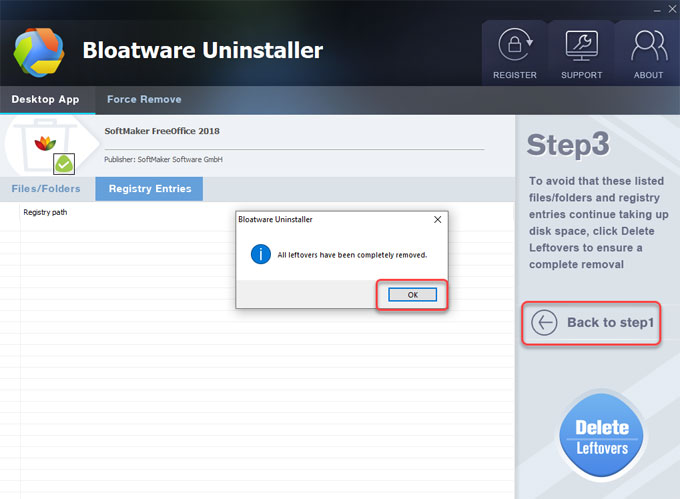
Step 7: Click Delete Leftovers > click Yes to be sure you want to delete all FreeOffice leftovers.Once done, you will see all leftovers have been completely removed. Restart your PC.
Step 8: Once done, click OK > click Back to Interface to have a check. At last, Restart your computer.
Refer to an easy video guide on how to uninstall FreeOffice from Windows:
At Last
Till now, if you’ve been familiar with how to remove FreeOffice through the Windows-built in uninstaller, give it a try. It is necessary to clean out the leftover files and registry entries completely. If you are not confident in uninstalling FreeOffice manually, then the provided Bloatware Uninstaller can help you. The professional uninstaller allows you to remove unwanted programs without any efforts. If you are interested in trying Bloatware Uninstaller, click the button as followed to get started immediately.
Categories
- Acer Software
- Anti-Spyware
- Antivirus Programs
- ASUS Software
- Browsers
- Business Software
- CD Burners
- Cloud Storage
- Communication Tools
- Compression Tools
- Desktop Customization
- Desktop Enhancements
- Developer Tools
- Digital Photo Software
- Driver
- Encryption Software
- Games
- HP Software
- Intel Software
- Interface Tool
- Internet Security Software Suites
- Internet Software
- Keyboard Drivers
- Lenovo Software
- MP3 & Audio Software
- Networking Software
- News
- Operating Systems & Updates
- Other Browser Add-ons & Plugins
- P2P & File-Sharing Software
- Productivity Software
- Security Software
- SEO Tools
- Text Editing Software
- Uncategorized
- Uninstall Backup Software
- Uninstall Download Software
- Uninstall e-book management software
- Uninstall FTP Software
- Uninstall Graphics Software
- Uninstall Monitoring Software
- Uninstall Office Suite Software
- Uninstall PDF Software
- Uninstall Player
- Uninstall Security Software
- Uninstall Utilities
- Utilities & Operating Systems
- Video Editing
- Video Players
- Video Software
- VNC Software
- Web Browsers
- Windows Tutorial
Archives
- June 2021
- April 2021
- March 2021
- February 2021
- January 2021
- December 2020
- November 2020
- October 2020
- September 2020
- August 2020
- July 2020
- June 2020
- May 2020
- April 2020
- March 2020
- February 2020
- January 2020
- December 2019
- November 2019
- August 2019
- July 2019
- June 2019
- May 2019
- April 2019
- March 2019
- February 2019
- January 2019
- December 2018
- November 2018
- October 2018
- September 2018
- August 2018
- July 2018
- June 2018
- May 2018
- April 2018
- March 2018
- February 2018
- January 2018
- December 2017
- November 2017
- October 2017
- September 2017

Comments
Leave a reply