-
How to Completely, Quickly Uninstall Google Update Helper?
- Mar 26,2021
- Uninstall Utilities
-
If you’re exactly one of those who have no idea how to effectively uninstall Google Update Helper in Windows, you’ll find useful instructions along with the program’s information on this page.

Google Update Helper is used to periodically check for updates. It sends information like version number, operating system, language as well as other details back to Google servers. It runs in the background of the system and automatically starts up when your computer boots, so that it can check for updates and download and install them for you.

Uninstall Google Update Helper with an All-purpose Tool
Using Bloatware Uninstaller will save you a lot of time, better ensuring a complete removal for the program you wish to remove. Here are video demonstration & specific procedures of how to uninstall Google Update Helper:
1. Click any of the blue download buttons on this page or visit the homepage to download Bloatware Uninstaller.
2. Click the Register button in the upper right corner, and fill in the box with your license key to complete the registration.
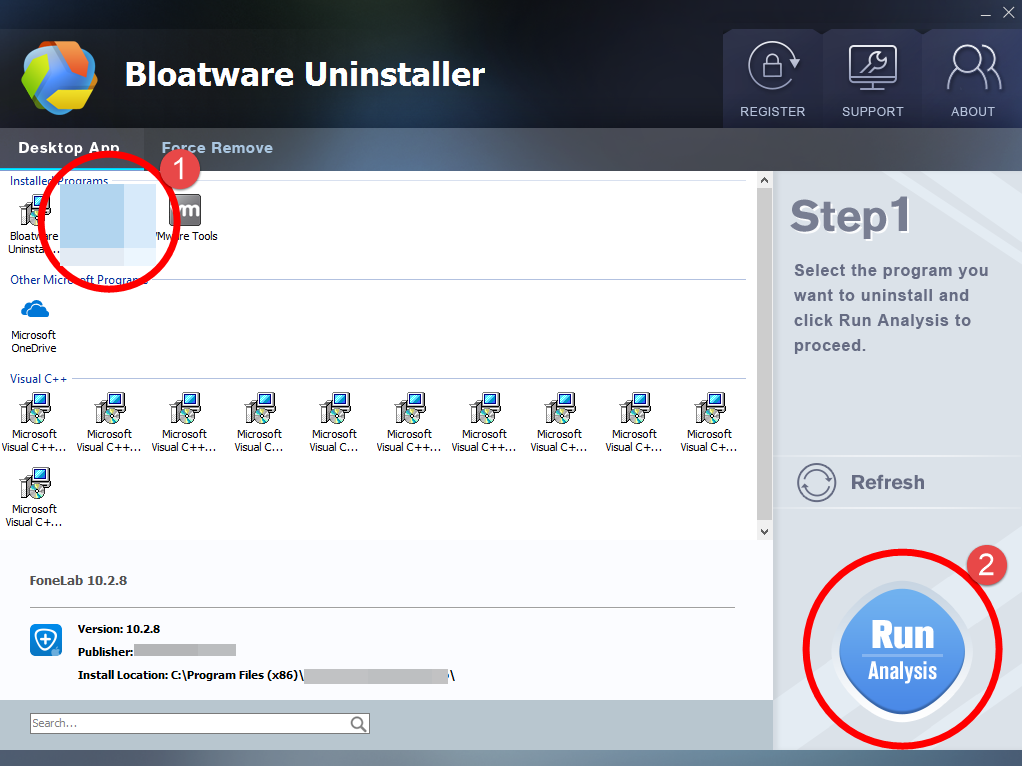
3. Run it, and you can see clearly what programs are installed currently. Choose Google Update Helper and click Run Analysis.
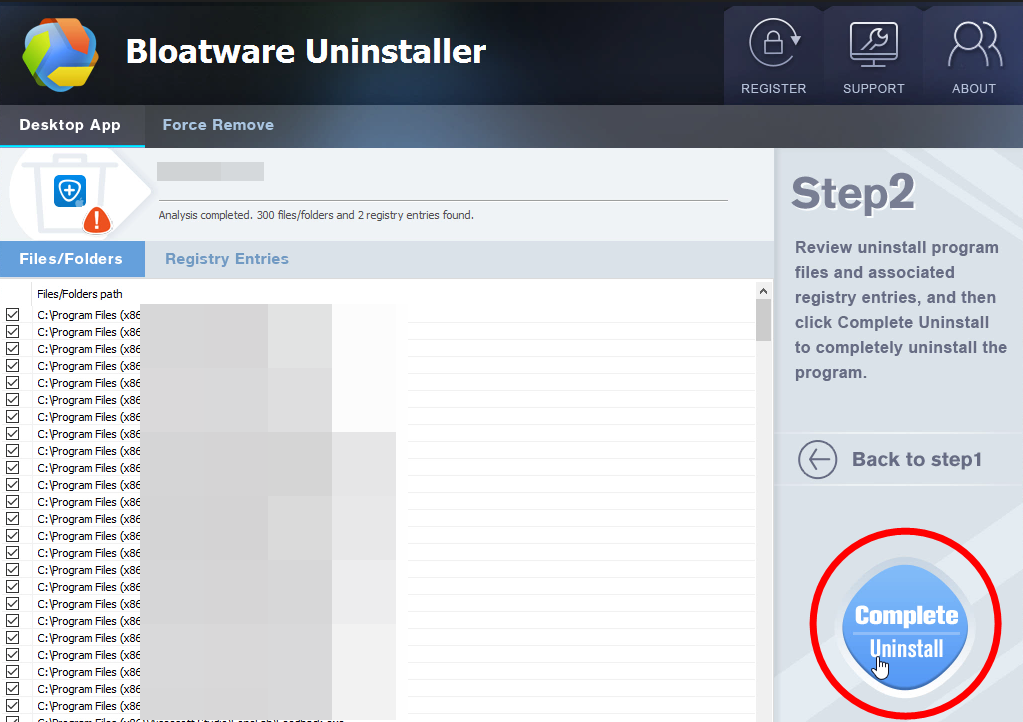
4. Keep all the listed files checked, and click Complete Uninstall on the right.
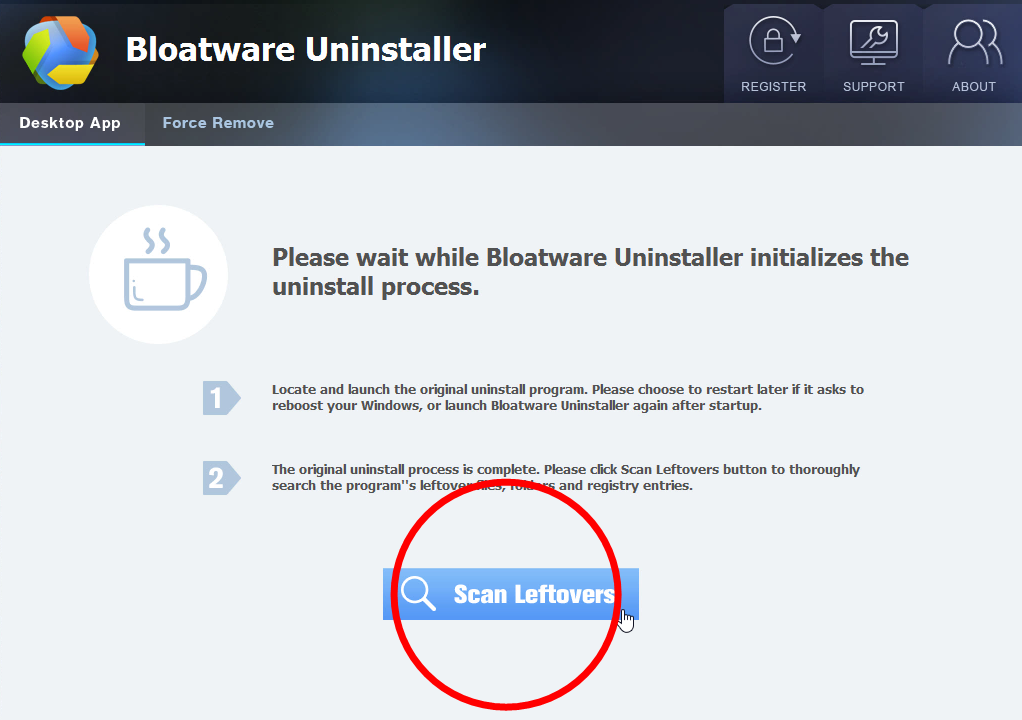
5. It will scan for all the related files and get ready for your next request, during which you may be asked for confirmation of this removal, just click Uninstall to proceed.
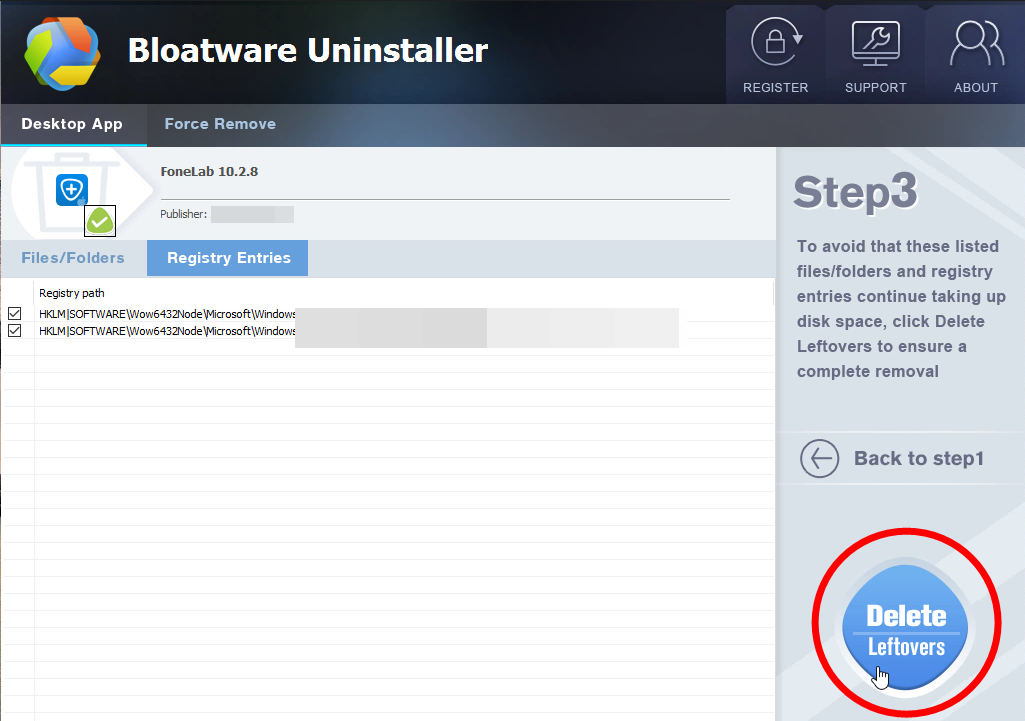
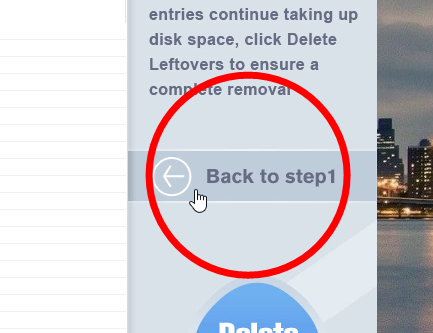
6. Click Scan Leftovers when it turns to blue, then you see the all the vestiges that most users will forget to delete during the manual removal. Click Delete Leftovers to fully uninstall Google Update Helper.
7. Clicking Back to step1 to refresh the list of currently installed programs, and check whether your target has gone.
You can perform the same steps to remove other unwanted programs on your computer. I do hope this recommendation can be a better removal solution to you anytime. To learn the manual removal way, continue your reading under the next subtitle.
How to Uninstall Google Update Helper by Regular Means?
1. Exit the Google Update Helper program.
Most programs will automatically close or ask you to shut them down during the removal, while a few will not. To ensure a complete, smooth removal, better shut down the program as well as the related possesses that are running in the background before activating its built-in uninstaller. You can do this through the System Tray and Task Manager.
2. Activate the built-in uninstaller of Google Update Helper.
Windows 8 (Start screen): Click on the Start button, click the Down arrow, find Google Update Helper in the Apps list, right-click on it and select Uninstall at the bottom.
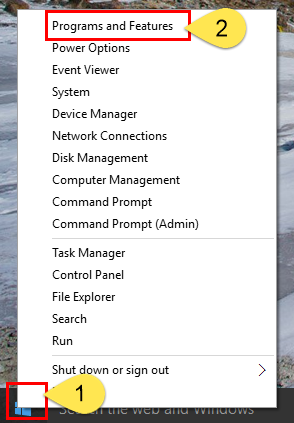
Windows 10 (Start menu): Right-click on the Start button, select Programs and Features, and locate Google Update Helper in the list.
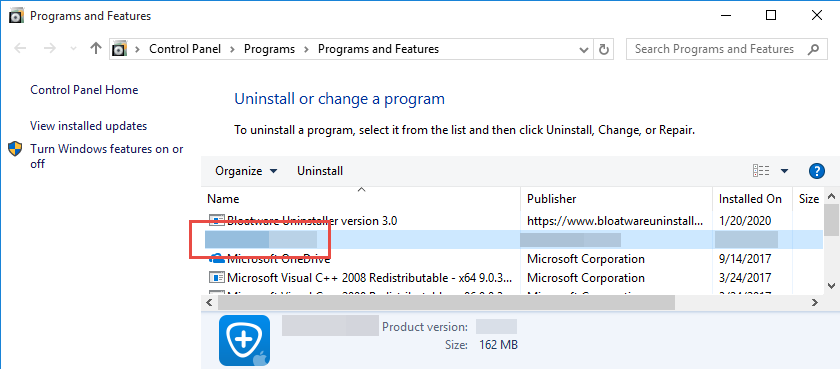
3. Uninstall Google Update Helper via the Programs List.
Now you should be looking at the Program List, which tells you what programs are installed on your PC, the names of them and their publishers, when they’re installed, and how much disk space they’re taking. Double-click Google Update Helper to activate its built-in uninstaller.
4. Follow the instruction to proceed and confirm the removal.
Once its built-in uninstaller pops up, click Uninstall to provide confirmation. Then wait until the uninstaller finishes its job, and move on to the next steps to search for the related lingering files. If you’re prompted to restart, do it right away or later, no big deal.
5. Uninstall Google Update Helper via the Registry Editor.
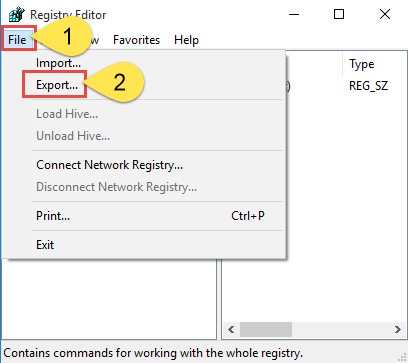
During installation the program registers itself in the system, that’s why you can find their entries in the Registry, it also explains why sometimes you can’t run a program by simply coping the folder from another device. This step is to delete the entries of Google Update Helper. But you should know that using the Registry Editor incorrectly can cause serious issues and may result in an inoperable operating system. So don’t delete anything wrong.
(You can also export the whole registry first, so that if anything goes wrong, you have a backup to “undo” the mistakes).
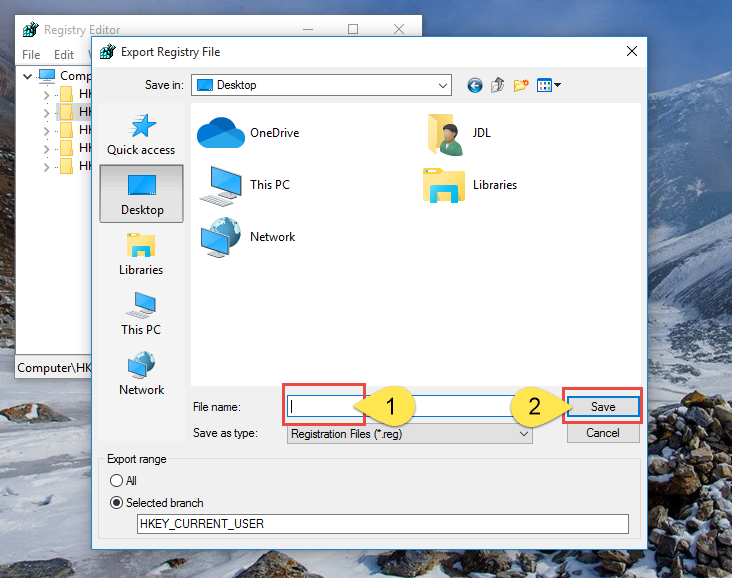
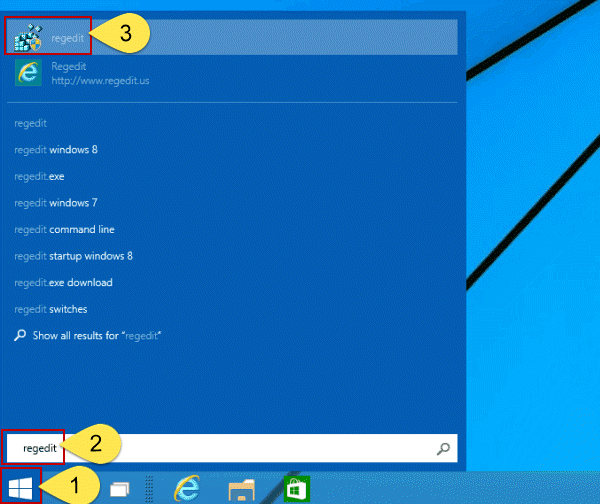
Windows 8 (Start screen): Press and hold the Windows key + C to open the Charms, select Search, type “regedit” in the field, and click the result to open the Registry Editor. Then on the navigator click Edit > Find, enter “Google Update Helper” to search for related leftovers to delete.
Windows 10 (Start menu): Execute “regedit” in the search input field on the taskbar to open the Registry Editor. Then on the navigator click Edit > Find, enter “Google Update Helper” to search for related leftovers to delete.
6. Restart the computer.
Do you have any questions about how to uninstall Google Update Helper? Write them below so that we get to know what we might have missed, and how to make it better for all users to read.
Categories
- Acer Software
- Anti-Spyware
- Antivirus Programs
- ASUS Software
- Browsers
- Business Software
- CD Burners
- Cloud Storage
- Communication Tools
- Compression Tools
- Desktop Customization
- Desktop Enhancements
- Developer Tools
- Digital Photo Software
- Driver
- Encryption Software
- Games
- HP Software
- Intel Software
- Interface Tool
- Internet Security Software Suites
- Internet Software
- Keyboard Drivers
- Lenovo Software
- MP3 & Audio Software
- Networking Software
- News
- Operating Systems & Updates
- Other Browser Add-ons & Plugins
- P2P & File-Sharing Software
- Productivity Software
- Security Software
- SEO Tools
- Text Editing Software
- Uncategorized
- Uninstall Backup Software
- Uninstall Download Software
- Uninstall e-book management software
- Uninstall FTP Software
- Uninstall Graphics Software
- Uninstall Monitoring Software
- Uninstall Office Suite Software
- Uninstall PDF Software
- Uninstall Player
- Uninstall Security Software
- Uninstall Utilities
- Utilities & Operating Systems
- Video Editing
- Video Players
- Video Software
- VNC Software
- Web Browsers
- Windows Tutorial
Archives
- June 2021
- April 2021
- March 2021
- February 2021
- January 2021
- December 2020
- November 2020
- October 2020
- September 2020
- August 2020
- July 2020
- June 2020
- May 2020
- April 2020
- March 2020
- February 2020
- January 2020
- December 2019
- November 2019
- August 2019
- July 2019
- June 2019
- May 2019
- April 2019
- March 2019
- February 2019
- January 2019
- December 2018
- November 2018
- October 2018
- September 2018
- August 2018
- July 2018
- June 2018
- May 2018
- April 2018
- March 2018
- February 2018
- January 2018
- December 2017
- November 2017
- October 2017
- September 2017
Comments
Leave a reply